Let’s face it: Application Security Modeling is a difficult topic. I’ve seen (and built) numerous attempts and security models using the Mendix framework, and they are rarely consistent and often misunderstood. I’m going to attempt to document my processes and procedures that I have determined to be best practices to hopefully help some developers out there struggling to find a “best practice security Mendix” search on Google. There are many ways to approach it so by no means is my approach the only way to do this, but I do know it works to ensure each element is considered in the modeling.
Step 1 – Project Roles
The first step is to understand how the Product Owner and business team group the users of the application. For example, one customer might think of users such as “Employees”, “Managers”, “Regional Leaders”, whereas another app’s customers might think of their users such as “Consumers”, “Editors”, or “SuperUsers”. No matter how they think of their user base, I generally like to name the project roles per how they think of the users that interact with the data being captured. Don’t let them steer the conversation towards what they should or shouldn’t edit or read yet; We’re not there yet! Start by documenting those Project Roles that you will use to create them in the Mendix App.
Step 2 – List of Module Tables and Starting roles
This is the step where things start to get interesting. Mendix by default allows you “auto add” the Project Roles into each and every Module as the module roles. NEVER, EVER DO THAT! I see this mistake all the time. It’s important you recognize a module for what it is: a transportable container of tables, pages, and methods designed to be used in multiple Mendix apps. If you think about Modules like this, it changes your entire outlook on security.
Think about the modules you download from the Mendix App Store. Have you ever seen one import with security roles like “SuperUser” or “Manager”? No, of course not, because those are roles that makes sense for an App, not a module. Those same best practices used to create those modules are what you should use to create your module security. Consider if you were needing to consume an API from one of your proprietary systems. You would build it with reuse in mind because another app could benefit from that integration module. You may never reuse that module, but you should still design the security as if you will. (You never know!)
Starting Roles
I like to start a module with three roles:
Reader (Read-Only) - A Reader is a special role that we will give limited read-rights to the Entity Attributes and Associations so they can view the data but not change it in any way.
Editor (Create/Write) – An Editor has rights to Create records and/or Edit them, as well as creating an association between Entities, such as linking a Customer to an Order.
Admin (System) – Admins are targeted at System Admins, who do not have access to the data of the application by are useful for setting up configurations within the module if needed, such as API URL’s or SMTP settings.
What I will do is create an XY Matrix, where X=Entity Names and Y=Module role. I am going to define what, if any, relationship exists between the Entity and the Role. I do this using three more standard definitions:
Blank = No relationship exists
U = Unconstrained relationship exists, meaning the default read or edit rights apply fully
C = Constrained relationship exists, meaning conditions exist that I can’t fully apply the default rights
Let’s see an example of this in action before we get too lost in letters and definitions. Image a Module with three Entities: Vacation Request, Day, and Balance Tracking. I need to figure out the security model to build to ensure each user is allowed only the minimum amount of rights to ensure they can do their job or use the app as intended. Your matrix will look like this:
According to this Matrix, I have determined the Admin role has nothing to do in this Module. I could just remove the role from the Module since I won’t be giving it any access, but I like to keep it because typically your Admin Project Role will get assigned to all Module Admin roles and your developers will be looking for that role to assign to the Admin. It’s a judgement call and I prefer to leave it in there.
For the Editor, I see I have a Constrained relationship with Vacation Request, but the Day and Balance Tracking Entities can be setup Unconstrained. I will need to define the Contrained conditions in the next step, but for now I know that anyone given the Editor role in the Module will be able to Create and Edit all attributes in the Day and BalanceTracking Entities. Similarly, I see Reader’s are only constrained on the BalanceTracking Entity.
To get to this point, I had to answer the following questions:
- Are there some records that a User could Edit and some they could not? Same with Read?
- Should a System Admin be allowed to create/edit the records in the Entity?
- Are there certain Attributes in the entity that a User could be restricted from Editing? Reading?
By answering these questions for each relationship intersect in the matrix, you will arrive at a table that looks like my example. The first few times you go through this exercise you might struggle with this a bit and I wish I was a better instructor to articulate a definitive and exhaustive list of questions to ensure you do this correctly, but practice implementing will make this easier with time. You will begin to think of the constraints needed before arriving at them later down the road. For example, a User can usually Edit their own data but not be allowed to edit others data, so I know to think of that constraint for appropriate tables.
Step 3 – Constraint Definitions for the Module Roles
We have determined that additional Module Roles will be needed to properly Edit or Read the Entities contained. The next exercise requires you to fill out a table such as this one:
I first define the intersect I have determined requires some type of constraint. For example, my first intersect requiring constraints was the VacationRequest – Editor. The first constraint that was determined was that a Submitter of a VacationRequest should only be able to Create and Edit their own Vacation Requests. Logically, I deduced I required a Role for a Submitter. The same applied to the creation of an Approver role.
Finally, because I had to create constrained roles for the Submitter and Approver, I needed a new role to cover a class of user that could Edit the whole table. I use a naming convention of the major Role name with the initials of the Entity. This is confusing to some and ask, “Why not just use ‘Editor’ instead of ‘EditorVR’ in this instance?”. The reason is that one table that isn’t constraining the Editor, BalanceTracking for example, gives full edit rights to the ‘Editor’ role. If I give a Project Role such as Manager ‘Editor’ and ‘Approver’, I will essentially be giving the Manager the unconstrained ‘Editor’ rights on the VacationRequest table by mistake because where Editor and Approver conflict (Approver is constrained), Mendix will always give the MOST rights. Therefore, you must be explicit about the role that has full rights to the table to prevent an accidental conflict that results in rights given that weren’t intended. This is the most common mistake I see in modeling security in Mendix (and any other type of application I have worked on over the years).
These constraints that are documented need to be developed in the Xpath for that role for that entity. Translate that requirement into the code to affect the appropriate constraint. The advantage of doing constraints at the entity level instead of the forms is that they are always protecting the data access, and you limit further visibility in the forms out of convenience. Form vs. Entity security is a different topic but this highlights the major rationale choice.
To recap, at this point, you have determined that the following roles will be needed in this example module:
- Admin
- Editor
- Reader
- Submitter
- Approver
- EditorVR
- ReaderBT
Step 4 – Attribute and Association Rights
Within each entity, evaluate each Attribute and Association and determine if the rights to read and write need to be restricted differently than what we established at the Entity level. Sometimes there is nothing to document here, but sometimes there are. I also like to capture if the attribute needs to be encrypted at rest, which is a different topic as well.
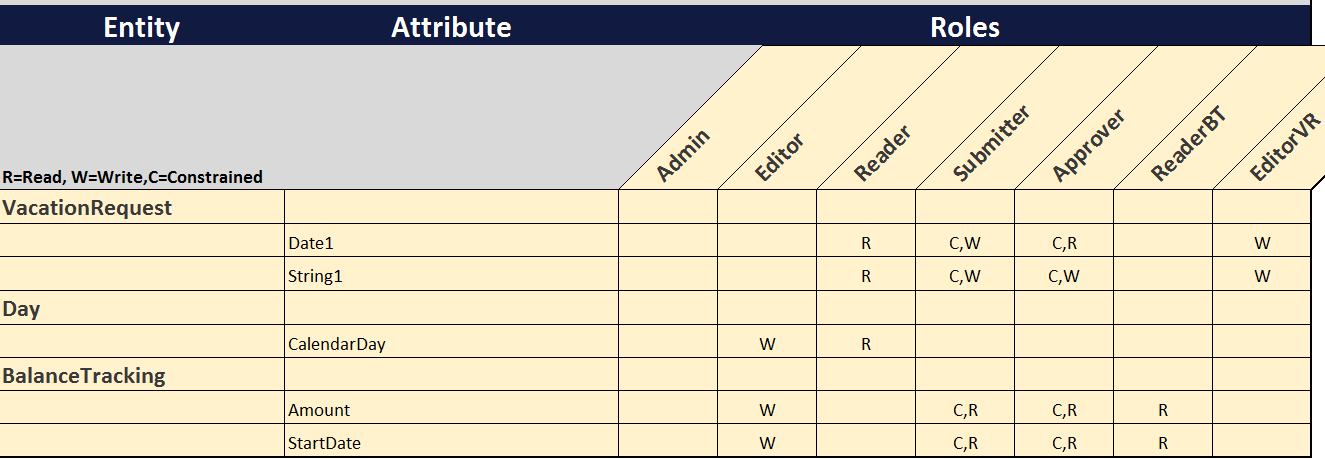
Step 5 – Final Module Matrix
Create a final XY Matrix that outlines the entire Module’s security. You should end up with something like this:
Finishing step 5 completes Module security. Going through the steps I’ve outlined will serve two purposes: The first is that you will have considered all the ramifications of access rights to your module entities and attributes and ensured you have the correct roles for your module. The second step is that you have created documentation which most enterprises appreciate. Should you need to make a change in the future, you can modify the documentation to make sure you get it right before developing it in your application.
Finally, you can evaluate your Project Security User Roles and assign them the proper roles in your module based upon their functional needs for each entity. Yes, it is a robust process that requires a lot of careful thought, but then, shouldn’t your app’s security model require that level of rigor?