While perusing the Mendix Forum this week I saw someone post the question as to how to make their Mendix Application aware that it was in Dev, Test, or Production. It had already been answered with a technique I use but for the novice Mendix user I’m not sure the answer was clear enough to be followed. I’m going to share what I do and what I’ve learned about this in greater detail to hopefully clarify the opaque answers given in the forum.
Why would you want to do this?
One of the biggest reasons why you would want to do this is to communicate to your users what environment they are in. For example, it’s a good idea to have a banner or change colors in your Test environment to help make it obvious that they are not in Production. Even though the URL’s are different people often save shortcuts to your application environments and might not pay close attention. At some point you will likely get feedback that a user can’t do something they should be able to do only to find out they are in the wrong environment.
Another key reason is that you might have Microflows that you only want to enable or execute in one environment or another. For example, I might not want to fire-off emails in my test environment, so I need a way to split the Microflow according to the environment I’m in to make sure that process gets skipped.
There are a number of reasons why you might want to do this and these are just a few. Now let’s see how to do it.
The “How”
I’ve encountered multiple solutions to engineer a way for this to happen. I won’t detail them all here. I’m going to stick to what I personally think works best: a Constant.
In your application, pick a module and create a string Constant. Set it to ‘Development’.
Now you have to ask yourself, “What are you wanting to change based on environment, Microflows, the ability to see objects or styling on the page, or both?”
Just Microflows
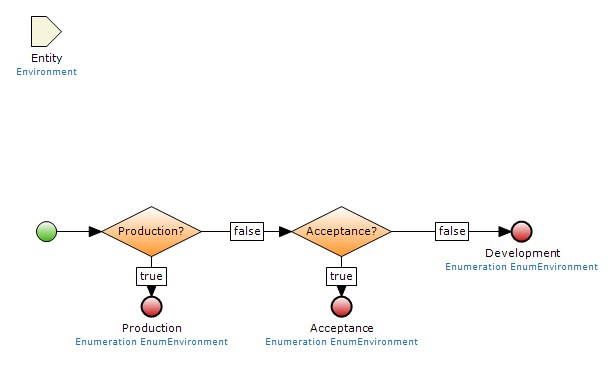
This is the easiest but least often situation. All you have to do now is open the Microflow(s) in question and add an Exclusive Split before the step in the process that you want to skip or take a new route based on the environment. Compare the Environment Constant’s value against what you will set them to, ‘Development’, ‘Acceptance’, or ‘Production’ and route accordingly. Simple.
Editing Visibility
This one is a bit trickier because you need to be aware of a few things. If you plan to Edit Visibility on a single page then that is one solution, but often you want to edit all of the pages. An example would be to enable the ‘Sign Out’ button in Development or Acceptance for Testing but disable it in Production because of the SSO configuration. In that case you will want to set visibility on the Layout. I’ll come back to this after I explain the setup for visibility.
As we know visibility settings in Table Rows or on objects require a Boolean or Enumeration attribute result in an enclosing entity, so let’s create that.
In your Domain Model, create a Non-Persistent entity called ‘Environment’. Add a single attribute based on an Enumeration. The Enumeration should contain one choice for each of your environments. For this example, I have ‘Development’, ‘Acceptance’, and ‘Production’. Once added, make it ‘Calculated’ and create a new Microflow for the calculation.
All you need to do is check the Environment Constant, compare it against ‘Development’, if True return that Enumerations value, if not test for ‘Acceptance’…you get the idea. You just need to return the value of the constant. Now your application will store the enumeration value of your constant value so that it is dynamically “aware”.
The easier of the two visibility situations to manage is on a single page. Drop a DataView into the page and then drop a table inside of it with one or more rows inside it. Base the DataView on a Microflow that creates a new ‘Environment’ object (that will already store the current environment’s enumeration value because of the calculated field we created). Next drop the objects such as labels or buttons into the rows according to what you want visible in each environment and setup the visibility on the row according to one of the Environment Enumeration values.
One off-shoot of this first situation is if you want to suppress or show other DataViews/DataGrids/etc. based on the environment. There’s a few ways to handle this, but I usually will just make the ‘Environment’ entity persist and associate it to the other entities I want to suppress so I can nest them appropriately. You’ll want to clean-up the created Environment object so you don’t store an infinite amount out there so I usually retrieve and purge all of the one’s they created on their last visit during the logon process in a SSO application or purge upon Log-Off if the application uses that.
The second visibility situation is where you want to show or hide items such as the ‘Sign Out’ button for every page in your application. In order to do this you need to add this feature to your layout. But wait, there is a catch! You can’t add a DataView to a Layout. Does this mean you have to add manually to every page in your system? No way.
It’s time to use our friend the Snippet Call. Create a Snippet but don’t define the Snippet with an Entity. If you do it will create it as a ‘Caller of Page’ meaning it expects a DataView as a wrapper. You can’t do it that way because the DataView isn’t allowed on a Layout. Inside of the new Snippet, create a DataView just like you did in the other scenario where you based the data source on that Microflow that creates and returns an ‘Environment’ object. Again, place the table with the rows you will suppress or show based on the environment inside of this DataView, remembering of course to place the objects like the ‘Sign-Out’ button or a CSS-Styled object in the appropriate row.
Now all you have to do is place the Snippet Call on your root master layout pages used in your application. If you built your layouts correctly you should only have a few (or as little as one) master layout in your application in which to place this.
Lastly, once you commit and deploy these changes throughout your environments, don’t forget to log on to the Developer Portal and set the ‘Environment’ Constant value accordingly or else they will all say ‘Development’. This is a one-time thing so you won’t have to worry about it anymore once you set it but be aware that if you don’t do this step none of this will work as designed.
Like I said in the beginning, there are a number of ways to do all of this. If this is new to you then you now have a guide in which it is proven to work. If any of you have different or simpler ways I’d love to hear from you in the comments so others that stumble across this post can learn as well!