
This week I tackled a pretty common issue with all successful apps: Enable use across more than the one group it was developed. When an application solves a business problem, the users tend to tell their peers about it. Suddenly, those peers realize they have a similar business problem and they want in on the solution. In this blog, I'll discuss the various factors that need to be considered when transitioning a single-purpose app into a multi-purpose one.
Step 1: Separate your data logically by 'unique' or 'shared'
Create a spreadsheet or write it on a notepad, but either way generate a two-column list outside of the app with those two categorizations. An example of data unique to a department might be a list of Business Justifications or workflow overrides due to exclusive data creation whereas shared data might be GL Accounts or Employee Benefit options. Separating these into disparate categories will determine which entities (that contain unique data) need to be associated to your new entity that divides the data, such as a 'Department' Entity.
Step 2: Create your entity and associations
Create the new entity that will split the app. I'll keep referring to that as the 'Department' entity. Each entity that contains the 'unique' data identified in step one will have a many-to-one relationship to your 'Department' in most cases, though you may have a few that are simply one-to-one relationships.
Step 3: Update the impacted pages
This is where your unique app details come into play, but they will follow a couple of patterns. An impacted page is one where you created an association from an entity that now links to 'Department'.
For pages that contain a list or datagrid of an impacted entity, you'll want to create a dataview object based on 'Department' as a wrapper, and drop that datagrid or list into the dataview. Now change the data source of the list or datagrid to an "Association" through the 'Department'.

Association Link
If your datagrid or list is based on a microflow, you can't get away with that Association Link example. You'll need to add the link within your microflow. In this example, you'll first retrieve the specific 'Department' that you need and then add that two the retrieve of the association object as so (Note that Reference Set objects impacted by the change will need to be 'Constrained' by the associated path...an often overlooked property on the 'DataSource' tab of the object properties):

Account is already passing 'Expense' into the 'GET_Rev1Assignments' Microflow. 'Department' needs to be linked inside of the association.
![Retrieve the 'Department' needed. In my case, I retrieved the 'Department' of the '%[CurrentUser]%'](https://images.squarespace-cdn.com/content/v1/54e5df33e4b0a636c8b0a23b/1426164744474-CX6J43RUIWNEF4MJYV62/image-asset.png)
Retrieve the 'Department' needed. In my case, I retrieved the 'Department' of the '%[CurrentUser]%'
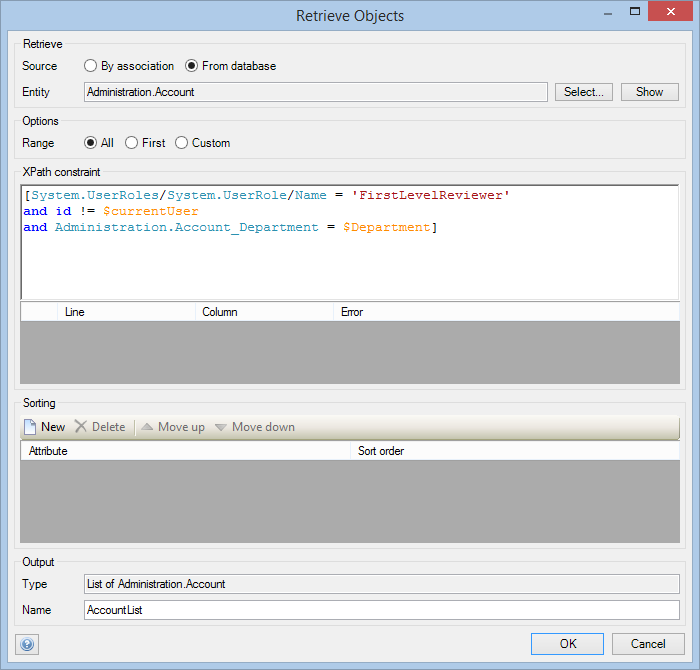
As you can see, I added the link to the $Department into the XPath constraint of the 'Account'
Step 4: Don't forget about History!
This step is multi-layered. You've setup the model and the pages to handle the new data split within the application and it's ready to roll out to production. But what about all of your historical data already in production? If you simply add this feature and forget to update historical data, you risk abandoning all of the 'unique' data that persists in your current-state application! You need to develop a feature for handling it.
If you simply add this feature and forget to update historical data, you risk abandoning all of the 'unique' data that persists in your current-state application!
Step 5: Develop that feature for handling history
How I deal with it is at the 'Administrator' level. I create a Microflow button on the Admin page that only the 'Administrator' role can see (think 'Visibility' constraints on the button properties). What that button does is retrieve a specific 'Department' and then sets the association of the related Entity to 'Department' to the retrieved $Department. That sentence is a mouthful, so maybe this example will clarify:
Start of a mass change microflow
This microflow goes on to change the other associated entities. Of course, before you can depress this button to kick off this microflow you'll need to logon and create the first 'Department' in the data so it matches and can be retrieved in this microflow. This works because there is no other data in the system at present other than a single 'Department', so setting all of the data accordingly is the right step. You can reuse this with some modification to mass change other data in the future in the event of splitting a department in two or more by first setting up a form to capture the old and new departments and pass them into this microflow instead of hard-coding like this one is, but that is slightly off the main purpose of this blog entry. After using this the first time, though, it's a good idea to remove the button that calls this microflow so you don't accidentally mess up future data captured.
Congrats!
By following the steps outlined, you should be able to quickly take a single-purpose application and make it multi-purpose. Each new 'Department' will have their own slice of the application to customize to fit their needs. Which leads to an important footnote: When designing your application, always assume this process will be needed and develop components and features that are configurable. For example, if your application incorporates workflow (Person A sends to Person B and so on), that process should be developed so it will work no matter what department uses it, such that roles could be enable or skipped based on configuration settings that the Application Administrator for that Department manages.
Lastly, this solution for making your application multi-purpose avoids developing new security roles. They aren't necessary if you setup the associations correctly and manage your end-user experience tightly. However, there are other ways to solve this multi-purpose feature strictly using Security roles and constraining entities accordingly. It will certainly get the job done just as well. I can walk through that solution as an alternative if demand warrants it. But I've found most Mendix developers, especially early on, struggle with the security model a bit and seek to solve their issues within the microflows and data rather than with security, so I offered this resolution first.